One of the first things someone asks me when they learn that I paint is ‘what do you paint with?’ The medium I’ve almost exclusively worked with is acrylic on canvas.
As a matter of fact, I think every painting I’ve created has only been with acrylic paints. (I’ve used different tools to apply the paint: paintbrushes, fingers, painting knives, sponges, paper towels, kitchen spatulas, string/yarn, jar lids, cardboard, dripping/squeezing/splashing/flicking onto the canvas… [hmm, this would be a fun topic to share])
The next questions asked are usually, ‘do you paint with watercolor?’, and ‘do you have to put water on the paper first, and how much do you use?’
Before today, the only time I’ve ever painted with watercolors is back in elementary school Art classes (late 70’s, early 80’s).
My mother-in-law took me on an outing last week (I am in between spine surgeries, and can’t drive yet), and I just so happened to buy a watercolor starter set that was on sale. I also stopped by the outrageously-priced craft-store book section and picked up a beginner’s watercolor book. Which I like so much, I will write a review in a future post.
In the meantime, the book is: “Watercolour Landscapes” by Geoff Kersey. In the book, he uses only three colors and three brushes that span nine lessons.


Image 1 – “Watercolour Landscapes” by Geoff Kersey
This afternoon, I sat down for the first lesson, Cloudy Sky.


Image 2 – Everything I need to paint my first watercolor painting.
I have gathered my things:
- 3 brushes: small, medium, and large
- 3 colors: cad yellow, cad red, cobalt blue
- Palette (I have 2 just in case – these are pretty small palettes)
- Clean water (small bowl)
- Water to clean my brushes (2 larger water containers)
- Little water picker-upper-squeeze thingies (to pick up some water and drop into my paint)
- And a stray m&m in case I get hungry while painting
I started off reading the lesson in full. Then I went back and read the first few steps, up until it states to let the painting dry completely. THEN, I read and completed the first step, which instructs you to add margins from the edges of the paper, and add a horizon at the one-third line from the bottom.
Step 1 – add margins (I added margins to make my painting 8×10), and pencil in the horizon line (the one-third line from the bottom)

Image 3 – My frame is penciled in, along with my horizon line.
Then I got so excited to start painting that I read the step to wet the top two-thirds of the painting area, which will be the sky.
I wet the sky! Woohoo!
I knew the next step, which is to start painting in the sky with the blue wash. I grabbed my large brush and realized I didn’t mix my paints.
Step 2 – mix your paints
I added a splotch of blue to a well in my palette, and added a squirt or two of water and swished it around with my brush.
I added a splotch of blue and splotch of red to a well, then added a little bit of water – the instruction stated the “grey”, which is really purple, should be thicker than the blue wash. Ok, ready.
Step 3 – wet the sky area
My sky dried. So I cleaned my large brush, then “painted” the sky with clean water to wet it. I think I wet it too much, because some of the water is running down my paper. I grab it with my brush and move it around to let it evaporate a little bit.
Now my sky seems to be wet enough, so ..
Step 4 – NOW paint the sky
I grab my blue wash in my large brush and paint the first large stroke at the top of the sky. I continue painting, adding just a little bit of blue wash to make sure my sky gets lighter at the bottom.
Done, looks good so far. Hurry and read the next step, cause it’s all about working while the area is still wet. This is called “wet on wet”, says my book.

Image 4 – My messy paint mixes – see how small the palettes are? Make sure you get larger ones to contain your thinned paints.
Step 5 – splotch out the clouds with a paper towel
I grab a paper towel, scrunch it up a bit, then splotch out the cloud area – removing the blue paint to leave white clouds. Nice, that was easy.
By the way, that is called “lifting out”.
Step 6 – sky still has to be wet down to the pencil mark, then paint in the trees
I grab the grey/purple on my large brush, make sure the area at my horizon is still wet. I have to grab a clean brush and wet it some more, quickly, and keeping my wet line straight and above/on my pencil line/horizon.
Now, painting on my tree line. Just dabbing on the paint. Watch as the wet water from above grabs the purple, making the purple bleed upwards, looking kind of like tree branches that are far away. Cool.
Now, I need to let the painting dry completely before moving forward.


Image 5 – A sky and tree line, with a suggestion of clouds.
Step 7 – add in some cloud shadow
I wet the middle parts of the clouds, leaving the top edge and the edge close to the trees dry. I use a clean brush with clean water.
I wet down the purple a little more, thinning it out. Then I grab a little bit on my brush and paint the midsection across my clouds, where the shadows or darker parts of a cloud would be. The books says to use a clean damp brush to soften them up a little more, just make them a little lighter and especially lighter as you get closer to the drier/top edges of the clouds. These should be pure white.
Allow the painting to dry… again.
Step 8 – painting the foreground – the snowy ground
Leave the bottom one-third of the painting DRY. Do not wet it. We are going to paint what is called “wet on dry”.
With a clean brush, my large one, and leaving the bottom one-third (the snowy ground) dry, I pick up some blue wash and paint a couple of long, broader strokes in the mid-top section of the snowy ground leaving some white directly under the trees, and not quite reaching the right side of the page. I paint a stroke or two down toward the bottom, thinning up with the blue wash, towards the bottom of the painting.
Step 9 – add the darker closest foreground
Then I use my same brush, pick up some of the grey/purple thinned out wash and paint a long broad stroke at the bottom of the picture. The foremost foreground should be darker than the further-away foreground to show depth.
I should be done; no other steps are listed.
Looking it over, I notice my cloud shadow had hard lines.

Image 6 – All steps completed, but my cloud shadow lines have hard lines.


Image 7 – Close-up of cloud shadows with hard edge lines.
I took my small brush, wet it with clean water and picked up a little bit of the grey/purple thinned out wash and kind of scrubbed the hard lines to make them softer.

Image 8 – Softer cloud shadow edge lines…
It seemed to be doing the job, but as the painting dried, I ended up with the harder lines again.
I don’t know how to fix this, for future reference. Maybe not have such a wet brush when painting in the cloud shadow?
If any expert watercolor painter knows, feel free to leave me a comment 😉 Thank you.
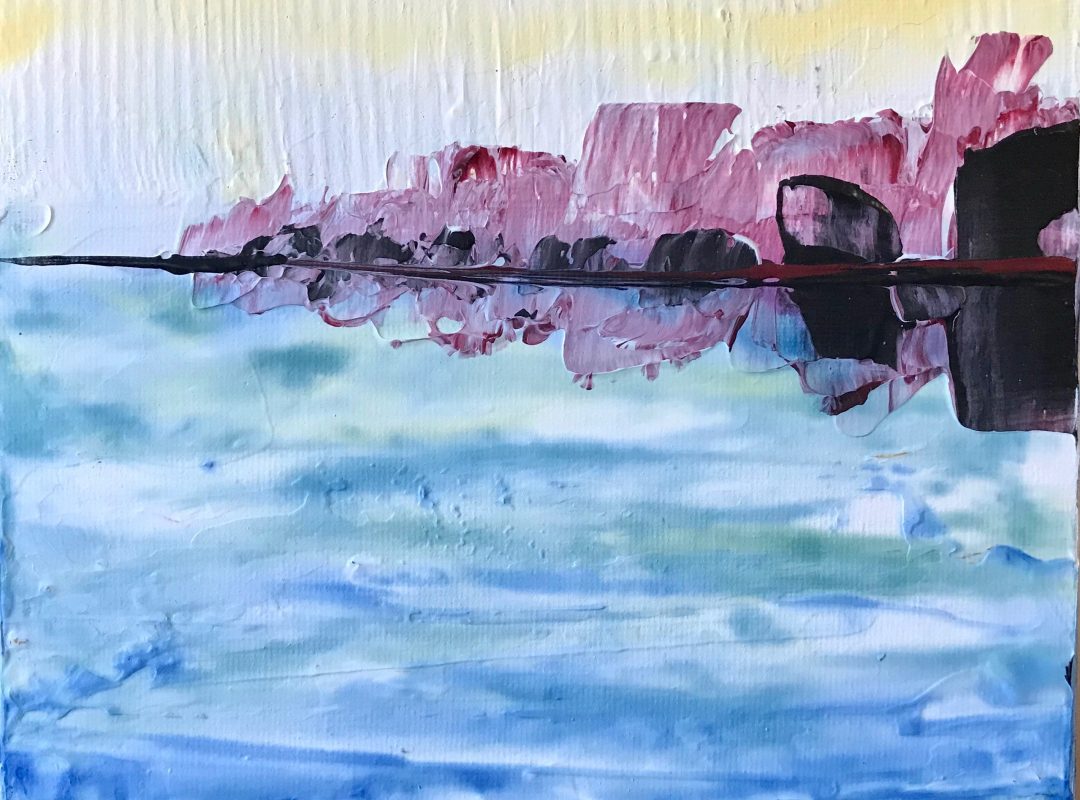
VOILA! I am done with my painting. I can let it dry, and see if it looks like something.

Image 9 – My first watercolor painting – COMPLETE.
I really liked the way the book author described detailed steps with nicely-detailed corresponding photos. I’m looking forward to continuing with more lessons.
I appreciate any and all comments. Tell me what your experiences are/were like when you paint with watercolors. Post questions.. If I can’t answer them, maybe other readers can. Or I will put a little more elbow grease into my searches for answers.
Plus, I’d like to see some of your work, too.
Thank you for reading! 🙂

